I was recently looking for a small, pocketable digicam to serve as a backup for my DSLR system. I wanted something with full manual control of shutter speed and aperture (and manual focus if possible), something capable of shooting in low light (which means an image stabilized lens and high ISO capability), a decent zoom range, good image quality and a reasonable price.
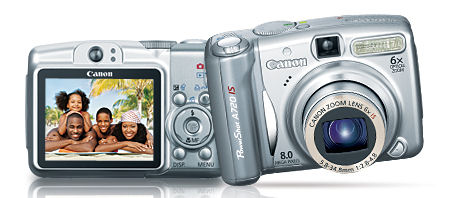
As I described in another article, I decided to go with a Canon Powershot A720is based on the specs as listed below:
- Manual exposure mode
- Av exposure mode
- Tv exposure mode
- Manual focus mode
- Manual flash power control (3 steps)
- Exposure compensation +/- 2 stops in 1/3 stop steps
- Flash exposure control +/2 2 stops in 1/3 stop steps
- 35-210mm (equiv), 6x zoom lens
- Shutter speeds from 15s to 1/2000s
- 8MP CMOS sensor
- Optical stabilization system good for 3 stops increased stability
- ISO settings from 80 to 1600
- Pocketable size
- Price under $200
Movie Modes
The A720IS also has a set of movie modes. It can record VGA (480x640 resolution) video at 30 frames/sec for either 1hr or when the file reached 4GB, whichever comes first. In the highest image quality mode, 4GB gives you just over 30 minutes of recording. With higher compression you can get about 1hr of VGA video. The A720IS is also capable of recording at 240x320 resolution at 30 frames/sec or at 160x120 resolution and 15 frames/sec (for emailing). The time limit for 160x120 recording is 3 minutes. Sound (mono) is also recorded while shooting movies.
Image stabilization operates in movie mode, making handheld shots much smoother, however you can't optically zoom the lens while recording.
IS and ISO - Low Light Shooting
The image stabilization system allows you to shoot in about 3 stop less light than you could without it. At the 35mm lens setting I could get sharp images down to a shutter speed of around 1/4s, while at the 210mm setting I could get sharp images down to about 1/25s. This is remarkably good performance.
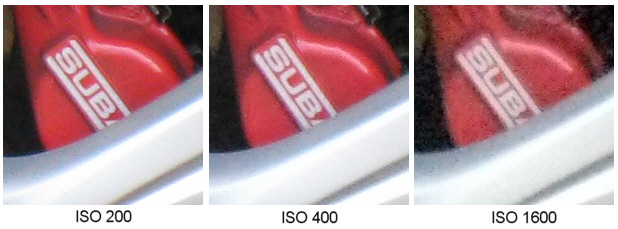
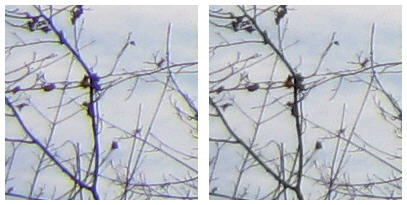
Crops at 100%
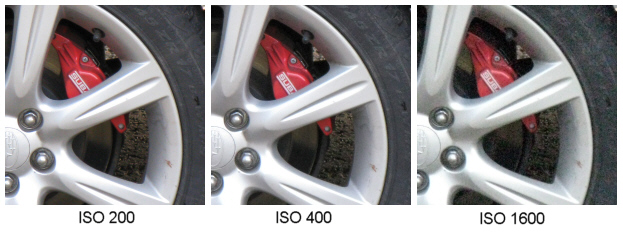
ISO can be set to 80, 100, 200, 400, 800 and 1600. Above ISO 400 noise becomes pretty noticeable and at ISO 1600 the automatically used noise reduction algorithm reduces image detail significantly as you can see in the set of 100% crops above. I've seen other reviews which imply that ISO 1600 is so bad as to be useless, but I think that's too harsh a judgment. I'll admit that if you look at an ISO 1600 shot on a monitor at 100% it looks pretty bad - but that's just about the equivalent to looking at a 24" x 36" print from a distance of 1ft. I took a number of shots at ISO 1600 and made 4x6" prints from them. To me they looked pretty good, in fact probably better than prints I remember having made from ISO 1600 film some years ago. So although ISO 1600 images are noisy and details are soft when compared to shots at ISO 80, they are far from useless as long as you stick to small prints. The images below are 25% crops from the original image. On a typical monitor (17" 1280x1024 resolution) they will represent section from a prints that is maybe 5"x7"
I wouldn't shoot at ISO 1600 unless I absolutely had to, but at least it's there if you really need it.
Image Quality
Image quality is surprisingly good for a high MP camera with a small sensor. Below is an example shot at 80mm (equiv) and f4 using the camera default settings for exposure and ISO 80.
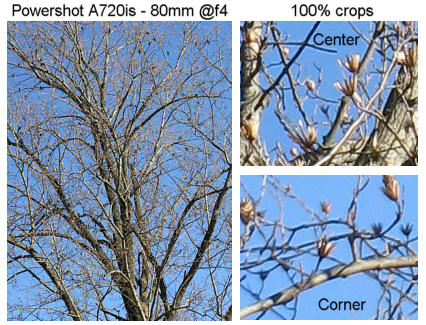
There's very little sign of vignetting and sharpness is consistent from center to corner. On the right are 100% crops from the image center and the extreme bottom left corner. There's little or no evidence of "purple fringing" or chromatic aberration at this focal length.
The shot was taken with all parameters (sharpness, contrast, saturation) set to "normal". In common with most digicams the A720is is set to give pretty sharp images with the default settings, which means that the default sharpness setting results in some very slight edge effects when looked at under 100% magnification. Sharpness can be reduced if you prefer to do your sharpening in Photoshop, where you have somewhat greater control over the parameters used. However the default values make excellent looking prints (which is what really counts).
At the widest setting (35mm equiv.), there is some chromatic aberration visible as shown in the image on the left below. This is a 100% crop from an image shot at f2.8 at 35mm (ISO 80)
left: Original image right: CA corrected
Chromatic aberration can quite well corrected in post-exposure processing using image editors such as Photoshop. The image on the right above shows the effects of such correction.
Optical Viewfinder
Optical viewfinders are becoming increasingly rare on digital cameras, but the A720 has one which zooms with the lens from 35mm to 210mm. It only shows about 80% of the frame and there's no diopter adjustment, but it's perfectly fine for aiming the camera and it can more than double the battery life if you turn off the LCD. Of course you can't really turn off the LCD since you need it to adjust the camera settings, but you don't need it on all the time.An additional advantage of the optical viewfinder is that you can use it even in the brightest sunlight, where it's sometimes tricky to see the LCD image clearly, plus I think you can hold the camera steadier held up against your eye than held out at arms length to view the LCD.
Manual Controls
In general the manual controls are available in what Canon call the "Creative Zone" modes, M (manual), Av (aperture Priority), Tv (Shutter Priority) and P (Program).While the Powershot A720is has a shutter speed range of 15s to 1/2000s, not all speeds are available in all modes. While you can set 15s in both M (Manual) and Tv (Shutter Priority) modes, in Av (Aperture Priority) and P (Program) modes the shutter speed won't go longer than 1s. I've seen similar behavior on other Powershot cameras and I don't really know why there is this limit, but just be aware of it). It's not a problem since if you really want a long shutter speed, just switch to Tv or M.
In manual mode the camera displays the set shutter speed and aperture plus an indicator of exposure from -2 (two stops underexposed) to +2 (two stops overexposed) in 1/3 stop steps. When it displays "0", exposure is correct.
The lens aperture is adjustable in 1/3 stop steps. At 35mm the range is f2.8 to f8 and at 210mm the range is f4.6 to f8. You can't stop down past f8 in any mode. This is because the senor is so small that if you could stop down to a smaller aperture, the image would be significantly softened due to diffraction effects. All small sensor digicams are like this, it's the nature of the beast.
Flash exposure can be set to manual or auto when using Tv, Av and M modes. In auto you can dial in from -2 to +2 stops of flash exposure compensation (in 1/3 stop steps). In manual mode there are three power levels, minimum, middle and maximum. With a fixed flash power output you control flash exposure via the aperture and ISO settings you chose. Using a flash meter I measured the maximum flash output GN as 16 (ft, ISO 100). In M, Av, Tv and P modes you can manually set the flash to 2nd curtain sync. In manual mode you just get one flash, so you could use it with a traditional optical slave flash. In auto mode the flash emits a metering pre-flash, so you need a digital aware slave which fires only on the main flash, not on the pre-flash.
In manual focus mode you can add a 10x magnifier to the center of the screen to make it easier to judge focus. A scale is displayed (in ft or m), though it's not very exact. It does show you where you are within the focus range though. There are two scales. One runs from 50cm to infinity with marks at 1, 2, 5m and infinity. If you close focus the scale switches to 0 to 50cm with marks at 10, 20 and 50cm.
Autofocus
There are a number of autofocus modes on the A720is. You can let the camera select from 9 AF zones which cover the whole image (AiAF mode). You can select the center focus zone only. You can select the center focus zone, but move it to any position in the image (Flexizone) and/or you can make it smaller so you can focus on a smaller area of the subject. There's also a Face Detect mode which focuses on faces and adjusts exposure and flash for best exposure.
Image Zone Modes
The A720is has the usual set of Canon fully auto modes which they call the "Image Zone" modes In each one the camera chooses the settings which it thinks are best. Some can be changed, though most are fixed. For example, in most of the program modes you can change the drive from single frame to continuous shooting or delay timer and you can set the image resolution and quality, but you can't change the metering pattern, flash exposure compensation, white balance, saturation, sharpness, contrast or ISO setting. The image zone modes are intended mainly for "point and shoot" work, though you can apply exposure compensation in 1/3 stop steps from +2 to -2 stops and turn the flash on and off as well as turning on and off features such as Image Stabilization and Face Detection.
Metering
Three metering patterns are available. Evaluative metering takes data from multiple zones. Centerweighted metering takes an average reading weighted for the center region of the image. Spot metering can be set either to take a reading from the center of the frame, or it can be set to take a reading from the AF zone when you have Flexizone AF mode selected (see "Autofocus" section above for Flexizone).
Image Data Display
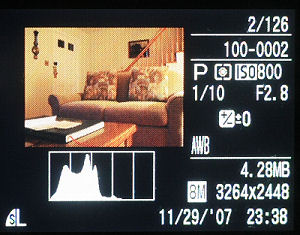
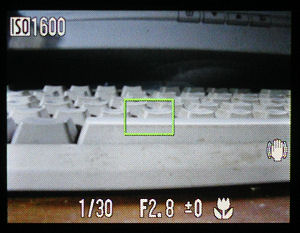
Prior to shooting the screen displays the shooting mode, ISO setting, shutter speed, aperture, exposure compensation, focusing mode and image stabilization indictor. The above image shows the camera was in Program mode, set to ISO 1600, image stabilization was active and the camera was in macro focusing mode.
Memory Cards and Data Storage
The A720is uses Secure Digital (SD) memory. SD cards are limited to 2GB, but the A720is can also handle the higher capacity SDHC cards. Canon supply a pretty useless 16MB card with the camera, which is enough to store 3 images at the highest quality, so make sure you buy a larger memory card when you buy the camera. You can also use MMC (MultiMediaCard) cards, though I don't know why you would.Images are stored as JPEG files at one of three different compression levels. The lower the compression the larger the files, but the higher the image quality. The A720is cannot store images in RAW format (in common with most other current Canon digicams)
Power
Like all "A" series Canon Powershots, the A720is is powered by AA cells. In this case just two of them. Canon say that you should get about 140 shots from a pair of alkaline AA cells with 50% flash usage and the LCD on. With the LCD off this goes up to 400 shots. Using rechargable 2500mAh NiMH cells you should get around 400 shots with the LCD on or 900 with it off. Though Canon don't specify what to expect from Lithium AA cells, I suspect you might get almost double the numbers for NiMH. This is pretty respectable performance. The advantage of using AA cells is that if you do run out of power unexpectedly, you can find alkaline AA cells in almost any general store in any part of the world.The A720is doesn't display a battery level indicator until the voltage drops to the point where it warns you to change the batteries. You do get a little time after the warning, but not all that much, so it would be advisable to carry a spare set of batteries with you.
Tripod Socket
A minor point, but the tripod socket is located on the left hand side of the camera base, not on the optical axis of the lens. Technically this means that if you use the camera on a tripod and take a series of images to stitch together, you're not rotating about the right axis. Even with the mount in line with the lens, you're still not quite at the right point, but you are closer. In practice this probably isn't going to be a big problem, but it's something to be aware of.The only advantage of having the tripod socket close to the left edge of the camera is that it means you can change the batteries and memory card without having to remove the camera from the tripod, since the battery and memory card door is over on the right side.
Size
The Powershot A720is measures 97 x 67 x 49 mm (3.8 x 2.6 x 1.9 in). This makes it larger than the smallest digital cameras such as the SD800 IS, which measures 89.5 x 58.0 x 25.1mm (3.52 x 2.28 x 0.99 in.) or the DS200/300 which measure 86 x 54 x 21 mm (3.4 x 2.1 x 0.8 in), but the A720is is still pretty small. The biggest difference is in the thickness of the camera. The A720is has a small "grip" where the two AA batteries fit and this makes the maximum thickness greater. However this grip section makes it MUCH easier to shoot one handed since it allows you to get a firm hold on the camera. You can easily slip the A720is into a jacket pocket and it even fits in the pocket of my jeans without too much trouble. It won't fit in a shirt pocket though, whereas a truly tiny camera like the SD200/300 will. The SD series cameras, while small, don't have the extensive manual control features of the A series cameras, so you have to chose between size and flexibility.
Conclusions
The Powershot A720is is a remarkably capable camera with extensive manual options. There's very little you can't do in the way of manual control as long as you select the correct mode. You have full control over shutter speed, focus, aperture, flash power and operation, metering, AF zones, image sharpness/contrast/saturation, drive mode, image stabilization and just about every other feature the camera offers. Of course you can also operate the camera in fully automatic mode if you wish. The lens quality is good and the zoom range is useful. There can be a little purple fringing of very bright areas, but it's not excessive and it's something seen in just about all cameras of this type. The image stabilization system is very effective. Focus and exposure are consistently good. Extreme highlights occasionally blow out, but that's indicated on the histogram display and is easily corrected by shooting again with a little negative exposure compensation. For the price (under $200 from Amazon.com) I think it's quite a bargain.What's missing? Well, a 28mm lens setting would be nice and the ability to record images in RAW mode would also be useful, but I can live without either one given the price and features of the A720is.
Note that the A570is is essentially the same camera, but with a 35-140mm zoom lens and a 7.1 MP sensor. If you don't need the extra zoom range of the 720is, you can save about $40 by buying the A570is.
Canon Powershot A720IS sample images
Post a Comment
Post a Comment